


Image Sharing / Sprite sheet
Concept of a sprite sheet
It's very useful to store several pictures on 1 image file: it saves loading time,
requests to the HTTP server and may be memory usage.
The aim is so to use 1 single image file to store all your sprites. Such a file is called a
sprite sheet.
Example of image:
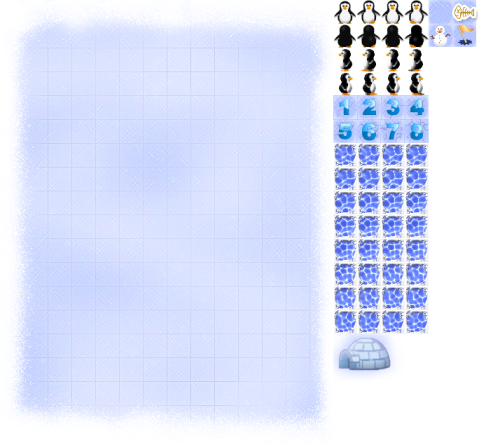
The question now is: How to use this single image file in several image nodes ?
How to use sprite sheets
To use sprite sheet is done in 3 steps:
- Load the image
- Dispatch the image to the nodes (CGSGNodeImage, CGSGNodeSprite, ...)
- Each node using the image should slice it to only use the needed region
Load the image
To load an image is achieved in Javascript:
            //load the image normally, like in any JS context
			this.img = new Image();
            //specify which function to call when the image will be loaded
			this.img.onload = this.onImageLoaded.bind(this);
            //start the loading
			this.img.src = "images/board.png";
Dispatch the image
Once the image is loaded, you can send it to every node you need.
The CGSGNodeImage and CGSGNodeSprite classes provide a "setImage(img)" method.
So, when the image is loaded, just call this method with the image in parameter:
            /**
             * Fired when the image loading is complete.
             * Set the image object (img) to our image nodes
             */
            onImageLoaded: function () {
                this.imgNode1.setImage(this.img);
                this.imgNode2.setImage(this.img);
            }
As we will set the image to the image Nodes after the initialization, we don't have to specify an image URL on the CGSGNodeImage constructor:
                this.imgNode1 = new CGSGNodeImage(
                    90, //x
                    40, //y
                    null); // no url. no need to load image now
Slice the image
Well, now we have a single image and have pushed it to our nodes.
That's a good start: we have consumed few bandwidth of the network and low memory.
However we still need to slice the image in the nodes, to use only the region it needs.
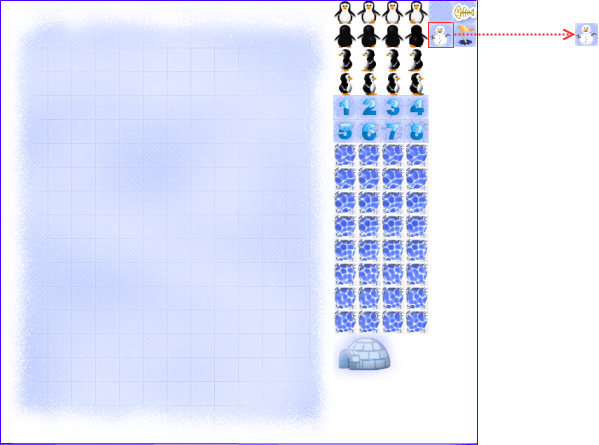
What is a slice ?
A slice is a piece of the image, i.e. the small region from the original image to render.In the following example, we slice the snow man from slice position = [429, 23] and a slice dimension of [23, 23]:
That can be applied on a CGSGNodeImage instance with the "setSlice" method of the class:
                           /**
                            * Set the slice into the image
                            * @method setSlice
                            * @param {Number} x position X of the slice in the image
                            * @param {Number} y position Y of the slice in the image
                            * @param {Number} w width of the slice
                            * @param {Number} h height of the slice
                            * @param {Boolean} updateDimension If true, the dimension will be set with the dimension of the slice
                            */
                           setSlice: function (x, y, w, h, updateDimension);
                            /**
                             * Add an animation for this sprite
                             * @public
                             * @method addAnimation
                             * @param {String} name Name for this animation
                             * @param {Number} speed Number of frames between 2 steps
                             * @param {Number} frames Number of frame for this animation
                             * @param {Number} sliceX slice position inside the image for this animation
                             * @param {Number} sliceY slice position inside the image for this animation
                             * @param {Number} width width of 1 frame
                             * @param {Number} height height of 1 frame
                             * @param {Number} framesPerLine Number of frames per line in the image
                             */
                            addAnimation: function (name, speed, frames, sliceX, sliceY, width, height, framesPerLine);
So, to slice the snow man from our sprite sheet to the "this.imgNode1" node we just define the region of the slice in the image:
                                    //x, y, width, height, must recompute dimension
                                    this.imgNode1.setSlice(429, 23, 23, 23, true);
Full example
Here is a complete example of code :
    var CGMain = CGSGScene.extend(
	{
		initialize: function (canvas) {

			//call the constructor of the parent class (ie : CGSGScene)
			this._super(canvas);

			////// INITIALIZATION /////////

			this.initializeCanvas();
			this.createScene();

			this.startPlaying();
		},

		initializeCanvas: function () {
			//resize the dimension of the canvas to fulfill the viewport
			this.viewDimension = cgsgGetRealViewportDimension();
			this.setCanvasDimension(this.viewDimension);
		},

		/**
		 * Just create a single node (an image node)
		 */
		createScene: function () {

			this.isDragSelectEnabled = true;

			//first, create a root node
			this.rootNode = new CGSGNode(0, 0, 1, 1);
			this.sceneGraph.addNode(this.rootNode, null);

			//second, create the 2 nodes, with no image URL, and add them to the root node
			this.imgNode1 = new CGSGNodeImage(
				40, //x
				40, //y
                null); // no url. no need to load image now

			//cut the slice from the source image
			this.imgNode1.setSlice(476, 0, 34, 34, true);

			//add some attributes
			this.imgNode1.isResizable = true;
			this.imgNode1.isDraggable = true;

			//add image node to the root of the scenegraph
			this.rootNode.addChild(this.imgNode1);

			this.imgNode2 = new CGSGNodeImage(
				90, //x
				40, //y
                null); // no url. no need to load image now

			//add some attributes
			this.imgNode2.isResizable = true;
			this.imgNode2.isDraggable = true;
			this.rootNode.addChild(this.imgNode2);
			//cut the slice from the source image
			this.imgNode2.setSlice(612, 34, 34, 34, true);

			//then load the image normally, like in any JS context
			this.img = new Image();
			this.img.onload = this.onImageLoaded.bind(this);
			this.img.src = "images/board.png";
		},

		/**
		 * Fired when the image loading is complete.
		 * Set the image object (img) to our image nodes
		 */
		onImageLoaded: function () {
			this.imgNode1.setImage(this.img);
			this.imgNode2.setImage(this.img);
		}
	}
);